Setting Up Characters & Environments
Last updated 5 months ago
Open this article on a separate browser tab.
Ready to Meet Your Cast and Choose Your Sets?
Just like a movie needs actors and locations, your AliveSim scenarios need characters and environments where important conversations and decisions will happen.
The best part? Every character and environment you create here becomes available across your entire module. Create once, use everywhere - that's the power of the Content Library.
🔍 Why Content Library Assets Matter: Characters and environments you create here can be used in any scenario, any scene, anywhere in your module. This saves massive time and ensures consistency - your learners will recognize the same mentor character whether they encounter them in Scene 1 or Scene 5.
The Creative Building Blocks
You'll be working with two main types of assets:
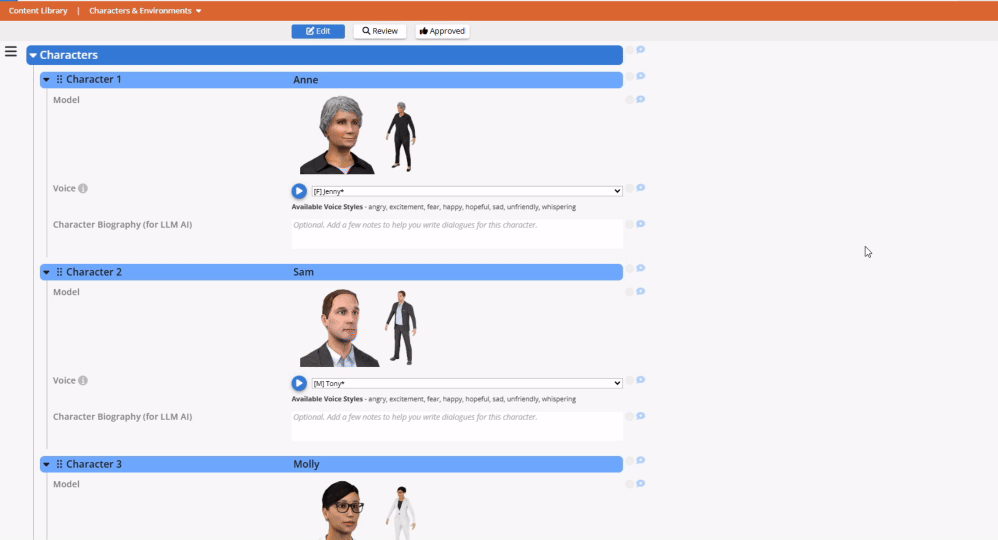
Characters: The virtual people who will have conversations, provide mentoring, and interact with your learners. Each character gets a name, visual appearance, and voice.
Environments: The 3D locations where your scenes take place: offices, conference rooms, hospitals, restaurants - wherever your real-world situations happen.
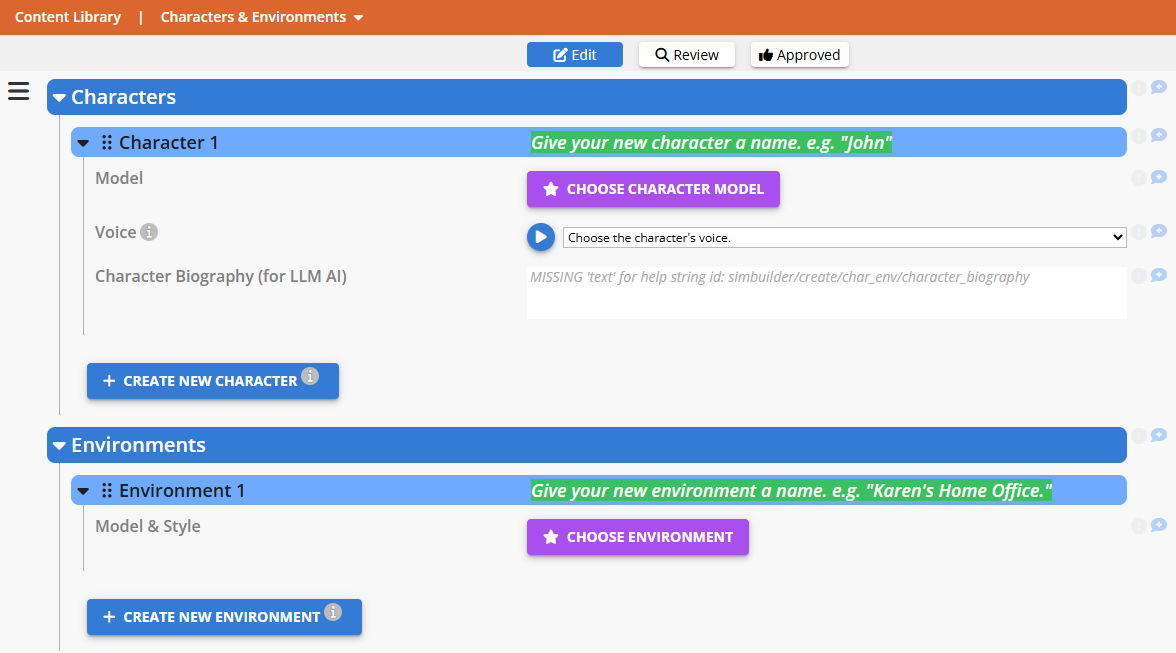
Creating Your First Character
Let's start with the star of your scenarios - the characters who will guide your learners through realistic situations.
Click CREATE NEW CHARACTER to begin:

Give Your Character a Name

Choose a name that learners will see throughout your scenarios. Here's what works well:
Short, common names are easier to work with, both for you when writing dialogue and for AI voices to pronounce clearly.
Memorable names help learners connect with characters across multiple scenes.
Professional names that fit your context (Professor Martinez, Officer Johnson, Dr. Smith, etc.).
Remember: You can always change this later if you decide the character needs a different identity!
Character Bio (Optional but Valuable)
💡 Future AI Integration: While the bio field is optional, it will help future AI features suggest appropriate models, voices, and even dialogue styles for your characters. A brief description like "Experienced mentor, calm demeanor, healthcare background" can also go a long way to help you remember what you had in mind for a character, when start writing dialogues for them.
Choose Your Character's Appearance
Click CHOOSE CHARACTER MODEL to see all available 3D character options:

Browse through the available models - you can hover over any image for a closer look. Don't overthink this choice:
You're not locked in: characters can be changed anytime.
Multiple outfits available: most characters have several wardrobe options you'll choose later.
Focus on overall fit: pick someone who feels right for the role, knowing you can always adjust.
Click on any image to assign that model to your character.
Select Your Character's Voice
Click the dropdown in the "Choose the character's voice" menu:

Listen before you decide! Click the blue play button next to any voice to hear a sample.

Voice Selection Tips:
Test a few options: voices can dramatically change how a character feels.
Consider your audience: match voice energy and professionalism to your content.
Character Outfits: Customizing by Scene
Here's something powerful: while you create the basic character here, you'll choose their specific outfit for each scene during Setup Stage.

When you add characters to scenes, you'll see outfit options like this. The same character can wear different color variations and styling in different scenes - perfect for creating visual variety while maintaining character consistency.
💡 Scene Flexibility: This outfit system means one character can appear with different styling for different contexts while maintaining their core appearance and identity.
Creating Your Environments
Now for your virtual locations: the 3D spaces where all these character interactions will happen.
Click CREATE NEW ENVIRONMENT:

Name Your Environment

Give your environment a clear, descriptive name:
Think about the scene's purpose: "Client Meeting Room," "Emergency Department," "Sales Floor."
Clear naming helps with workflow: You'll thank yourself later when need to choose between multiple environments while setting up new scenes.
Names can be changed anytime as your vision develops.
Choose Your 3D Location
Click CHOOSE ENVIRONMENT to browse available locations:
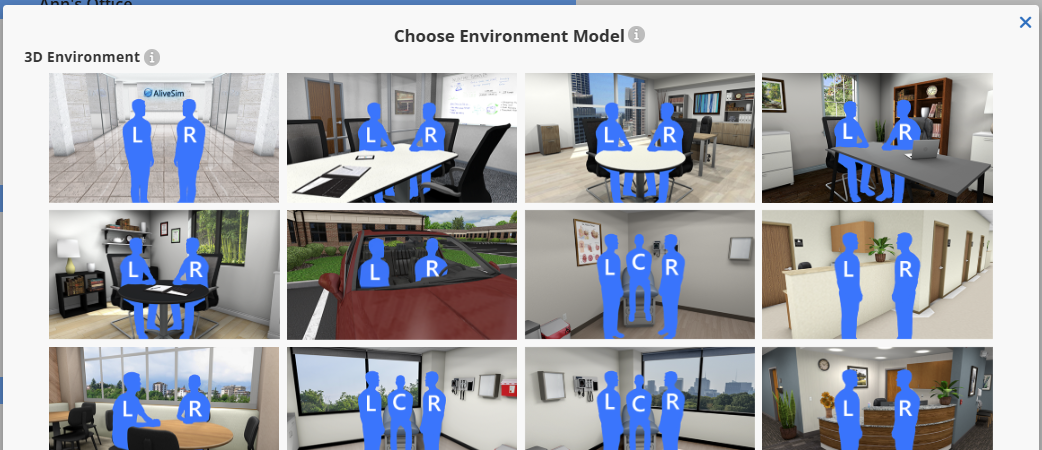
Understanding Environment Options:
Blue silhouettes show where characters can be positioned in each scene.
L, C, R markers indicate Left, Center, and Right character positions.
Multiple camera angles are available for some locations: use different views of the same space in different scenes.
Environment Styles and Customization
Most environments offer multiple decoration schemes:
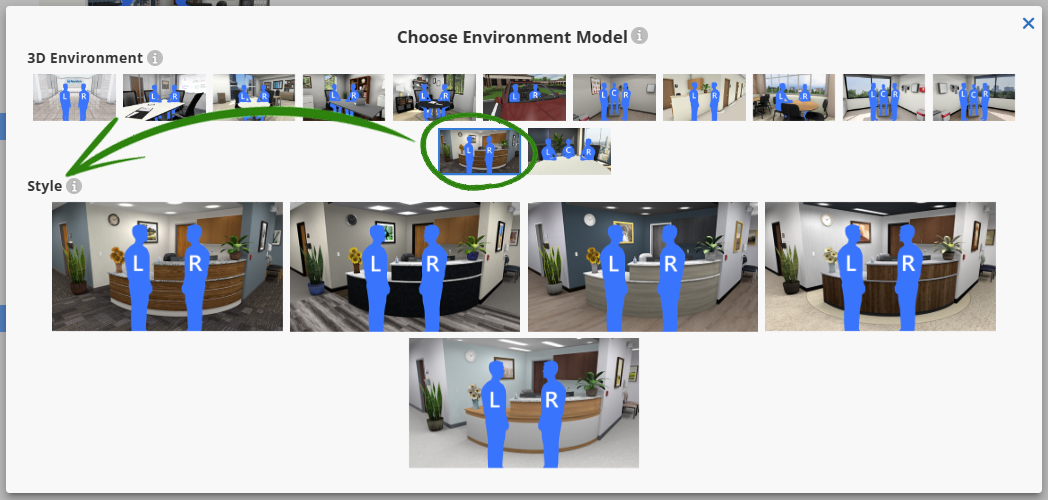
Click on an environment to see available styles, then click on a style to select it. This is where you can customize the look and feel - modern vs. traditional, bright vs. subdued, formal vs. casual.
Ready for the Setup Stage!
You've just created the foundation of your interactive scenarios. Every character and environment you've set up here is now available to use across all your scenarios and scenes.
What's Next? Head back to Setup Stage where you'll:
Add characters to specific scenes and choose their outfits.
Assign environments to scenes for the perfect setting.
Configure your decision zones and other interactive elements.
See your virtual world come together.
💡 Pro Tip: You can always return to the Content Library to add more characters or environments as your scenarios develop. The creative process is iterative: build, test, refine, repeat!
Quick Reference
TASK-LIST:
Create characters with names, models, and voices that fit your scenarios.
Add optional bios to help with future AI integration and keep character details in mind when writing dialogue.
Set up environments that match your real-world contexts.
Remember: everything can be modified later as your vision develops.
Return to Setup Stage to assign these assets to specific scenes.
Your virtual world is taking shape! Time to see these characters and environments come together in actual scenes where the magic of AliveSim really happens.
Powered by Syandus Immersive Learning Technology